Recently I was given a water damaged Macbook Pro Retina, a beautiful machine that sadly no longer works...
My first thoughts with the Laptop were to remove the screen and turn it into an identical monitor for my own Retina Macbook Pro. This seemed favourable as someone from Russia (I think) is creating a small number of LCD controllers specifically for the panel inside a retina Macbook pro. I am still sitting on that idea as the controller will come close to $200 Au (which isn't bad) but for a little bit more i can pick up a larger monitor that will serve me better. So with that idea put on hold I had to think of what to do with the SSD which may or may not still work.
Now onto the iMac
Yesterday my $30 ebay adapter arrived. It is an 18+8pins Macbook pro/ Air SSD to sata adapter which surprisingly worked flawlessly. At the time I didn't have an enclosure for it to use externally so I got out the old family iMac that had recently died due to a suspected HD failure.
After 20 minutes of dismantling I had the new adapter installed in place of the monstrous 3.5inch drive. With a press of the power button the iMac made its signature boot sound and the fan whirled up to full speed, their was however no picture...
Within a few seconds I realised i didn't plug in the display cable and LCD temp sensor (hence the fan) which was a seriously dumb move.
Currently the iMac works amazingly, speedy boot times make it a pleasure to use. Overall the machine starts up in just under 30 seconds and a little over a minute once you log on. The LCD however does have an ominous yellow tinge which is unnoticeable when watching shows so I doubt I will bother to replace it. At the current time the SSD will stay put but I do plan on switching in a regular 2.5inch drive as the Macbook SSD is definitely a bit more valuable.
I am pleasantly surprised at the performance of this 7 year old iMac, with a 2.8ghz intel core duo, 2gb (-_-) of ram, an ATI radeon HD 2600 pro and now a 256gb SSD. The iMac definitely does its job as a now repurposed media and browsing computer.
I will continue these posts as I tinker with computers and mobile devices.
All tutorials I used were on ifixit.com which is the first place I look when dismantling or fixing a device.

Friday, 14 August 2015
Monday, 3 August 2015
DBRAND Oneplus One Skin Carbon Fibre
Today alongside my Pebble Time skins, I received a new Skin for my Oneplus One.
So if the photos don't hint enough the new skin looks super crisp on my Oneplus.
I went with black and red Carbon Fibre colours both of which go hand in hand.
A recent addition to the Oneplus Skin from Dbrand is the inclusion of the Oneplus Logo a small touch that makes the phone just that much better.


Sunday, 2 August 2015
DBRAND Pebble Time Skin
A month ago i received my Pebble Time smartwatch and to say the least, I love it.
It stays on my wrist so frequently that its feels like i never charge it. The trade off of it staying on my wrist so much is that it is susceptible to wear when going about my daily routines.
I have had it on when gardening (although it was hidden underneath a glove) whilst cleaning/working on my car and mainly while at work.
This is where DBRAND stepped up and boy did they deliver. As expected the Pebble Time skins come in all of the usual flavours allowing you to mix up to three different colours/textures on the one device.
I went with the Gold outside bezel, matt black inside bezel and then titanium on the buttons.
First I was skeptical about Gold so I did order a backup Titanium skin for the outside bezel. Now that the Gold has been applied I will be sure to leave it on for the next coming months as it suits the watch and my chosen watch face extremely well.
The skins for the watch buttons are a nice addition however it will be interesting to see how they hold up against some lengthy use.
In conclusion, the DBRAND skins do add to the Pebble Time both functionally and aesthetically. Providing protection and a refreshed look for the much loved smartwatch.
Here are a few pictures of my own Pebble Time to help you decide whether a skin is worth it.


Follow this link to get your very own Pebble Time skins from DBRAND.
Monday, 27 July 2015
The newly unveiled Oneplus 2
The moment has come, the Oneplus 2 (two) has officially launched. Watching the launch through VR was definitely a different experience, walking through OnePlus with Carl and sitting in on a conversation with Oneplus forum members who won a chance to see the OnePlus 2 early. Fans shared their experiences of owning a OnePlus One and being apart of the forum community. The oneplus two has a snapdragon 810, 4gb LPDDR4 ram, 64gb storage, 5.5inch display and a 3300mah battery. The Oneplus two does include a dual sim thanks to the Qualcomm 810 processor. Their is a notification switch on the side which allows you to toggle between three settings. Their is a fingerprint sensor on the front. The back includes styleswap covers that are this time easier to swap out (thankfully). The front display is a 5.5 inch 1080p panel that is said to perform well in daylight thanks to its increased brightness. On the back is a 13mp OIS shooter paired with laser autofocus to make it super snappy. To finish off the list of specs, the Oneplus Two runs Oxygen OS which is a unobtrusive take on Android L which hopefully doesn't hinder the devices overall experience.
The VR experience in a whole was good until the invite codes started popping up everywhere, prompting you to swing your phone around to find them and not focus on the actual device and launch. Yes it is gimmicky but it did create some (-__-) #HYPE.
Hit up this link here --> for the Oneplus Two Page https://oneplus.net/hype
Make google play credit with my #3 must have app
Number 3 of my must have apps is Google Opinion Rewards
Google Opinion Rewards is a Google app that rewards you with Google Play credit upon completing extremely short surveys. You begin by answering a few questions that ultimately determine what surveys you are sent, as each one is based on locality, age and income, to name a few.
Each survey can reward anywhere from $0.10 and higher depending on the length and topic of the survey. That may seem like an insignificant amount but as to date I have amounted around $10 aud of credit, meaning I haven't spent any of my own money on apps recently.
If you are patient enough to save up credit, or wait for apps to drop in price, the Google Opinion Rewards app has the potential to supply all the credit you need for infrequent app purchases.
I don't really have any negatives about the app as the surveys are short, sweet and provide surprisingly fair amounts of credit based on the length and complexity of each survey.
This app is definitely a must for any Android user.
Monday, 13 July 2015
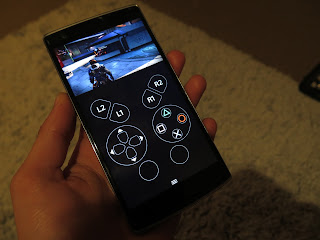
Playstation 4 Remote Play on any Android Device
Up until now remote play has been exclusive to certain Sony devices only. A feature that I assumed was exclusive, due to certain hardware compatibilities between Sony devices... I was obviously terribly wrong as thanks to the folks over at the XDA forums you can now use remote play on most Android devices running 4.0+.
It is as simple as downloading and installing the APK but unless you have previously rooted your Android device to allow for wireless use with a ps4 controller, you will have to stick to the tedious touch controls.
A full list of instructions and downloads can be found on the official XDA page here.
Currently my daily driver is the Oneplus One which has proven to be capable enough to run the ported Remote Play app relatively well over a local network connection.
However as any Wifi based streaming their are limitations which may be noticeable when playing fast paced games where low latency and high reaction times are necessary.
My phone is not rooted so in order to use the remote play comfortably I simply plugged my PS4 controller into my phone via an OTG cable and everything worked as it should. Granted I had installed a key re-mapper some time ago so that may have something to do with the great compatibility.
Here are a couple of (average) pictures of Destiny running on my phone


Tuesday, 23 June 2015
Pebble Time Review
Yesterday my Pebble Time arrived, and after a modestly short unboxing i strapped it to my wrist and set off into the world.
No not quite as gracious as it sounds, however over its life i should truly find out whether or not the Pebble Time is a viable smart watch.
The Pebble Time is my first Smartwatch, I have briefly looked at both the Moto 360 and Apple Watch and was impressed by the build and function of both these watches. So why did I not choose either one of these?
First things first I own an Android phone, the Oneplus One to be specific so that immediately eliminates the Apple Watch. As for the Moto 360 I did nearly buy one at my local Harvey Norman but being a first generation device I wasn't so keen on investing in it.
Now back to the Pebble Time
The construction of the watch is a sturdy plastic with a metal frame surrounding the screen on top. The metal frame is very sensitive to fingerprints but easily cleaned with a small cloth.
All 4 buttons are solid and tactile, giving you confidence when navigating through the menus quickly. The rubber band is nice and thick and uses a metal buckle which is a nice touch. The watch is very comfortable and shouldn't be a pain when worn all day. I will be picking up a leather band for it to make the watch look a bit more 'trendy' and hopefully less sweaty on hot days.
When a text message comes in I can reply to it with my voice or from a list of presets or I can simply dismiss it. When a notification comes in that can't be replied to using text, the watch displays an option to open the app in your phone which can be handy. Every notification vibrates the watch gently and stays stored in the notification app if you don't dismiss it fully, allowing you to go back and check on anything you may have missed.
On the main watch face section of the UI you can hit the top button to see past events on your calendar or press down to see future events. Note this doesn't show you notifications, only alarms and calendar appointments.
If you press the middle button it takes you across to your installed apps. Pre installed are Settings, Music, Notifications, Alarms and Watchfaces. All of which can be accessed and re-arranged from the Pebble Mobile app. The last button to cover is the back button on the left side of the watch, which does exactly as described it takes you back (or left) through the menus.
All in all the Pebble watch delivers notifications from your phone whilst offering some limited features that any smartwatch should. The Pebble is appealing to me as it is less gimmick and more function making it a real contender as a viable smartwatch. Oh and it won't need charging every night which is was a big part of why I went for the Pebble.
For a quick unboxing video check out this one here.
Subscribe to:
Posts (Atom)